 I promised a long time ago to make an Easter Mystery.
 My Mystery is very simple, everyone can make it and "it" is going to be a tablerunner. So if you want to make this; stay tuned!!!!
 Step 1.
 Step 2.
I iron my first fabric on my ironing board. Then I place my second fabric on top of my first fabric. Make sure you place the edge of each fabric nearly on top of each other. Then I iron the second fabric. I do the same for the third fabric. Now you have a pile of three different fabrics, each folded in half. The ironing make the fabrics stick together in a way, and this makes it easier to cut the fabrics later :-)
 My first fabrics layering.
 Step 3.
Cut one strip in 5" OR 1,5".
Explanation; You need a total of approx. 100 pieces cut in the size of 1,5" x 5".
(When I cut my strips, I cut in the size of 5" because I will make more than one tablerunner.)
So if you have chosen 10 fabrics for the mid-part, you have to cut 10 of each.
 Step 4.
From my strips of fabrics I cut them in my width 1,5" (since I chose to make my strips 5" tall).
If you have cut your strips in 1,5", you have to cut them in 5" width.
 Step 5.
In every stock you now have 3 different fabrics cut in the right size. This metode is very accurate and easy to do. Repeat step 2 to 5 until you have cut every fabric you have chosen to be in your tablerunner. Pile each fabric for the record :-)
 Look at my palette :-)
 Step 1.
You have to collect a little of your light fabrics to the middelpart of the tablerunner. You are not going to need much of each, but four of these is also playing a part in the endings of the tablerunner, so you need a little more of these four fabrics.
I choose to make my runner out of these 14 fabrics. In addition to these fabrics you will need some scaps for your applique.
 Step 2.
 I iron my first fabric on my ironing board. Then I place my second fabric on top of my first fabric. Make sure you place the edge of each fabric nearly on top of each other. Then I iron the second fabric. I do the same for the third fabric. Now you have a pile of three different fabrics, each folded in half. The ironing make the fabrics stick together in a way, and this makes it easier to cut the fabrics later :-)
 My first fabrics layering.
  Step 3.
Cut one strip in 5" OR 1,5".
Explanation; You need a total of approx. 100 pieces cut in the size of 1,5" x 5".
(When I cut my strips, I cut in the size of 5" because I will make more than one tablerunner.)
So if you have chosen 10 fabrics for the mid-part, you have to cut 10 of each.
 Step 4.
From my strips of fabrics I cut them in my width 1,5" (since I chose to make my strips 5" tall).
If you have cut your strips in 1,5", you have to cut them in 5" width.
 Step 5.
In every stock you now have 3 different fabrics cut in the right size. This metode is very accurate and easy to do. Repeat step 2 to 5 until you have cut every fabric you have chosen to be in your tablerunner. Pile each fabric for the record :-)
 Look at my palette :-)
Tip: I use a tray for carrying my cut fabrics.
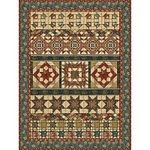
Arrange you rectangles in rows; 11 rows with 7 rectangles in each.
 Step 6.
 Step 7.
 This is how the mid-part is going to be :-)
 Step 6.
Sew the rectangles into rows.
Tip: I always use my stilletto to make sure the fabrics don't get displaced in the start and ending points. (We quilters simply LOVE every sewing tool in the world....)
 Step 7.
Iron the rows by pressing the seem in the same direction all the time. I simply iron from right to left each row. This make the seem more steady and firm and it is easier to sew the rows together later.
 This is how the mid-part is going to be :-)


 Quilter Blogs & Store Search


1 comment:
Hum ! Interesting start ...I follow you ! Hugs from France
Post a Comment